This was a triumph.
I'm making a note here: HUGE SUCCESS.

Search This Blog

Showing posts with label Navigation. Show all posts

Monday, December 2, 2013

How to hide links in the navigation from users that don't have edit permissions for certain pages in SharePoint 2013

Imagine you have a site that has managed navigation. Most of the pages in the site can be seen by all the users, but there is one page that has unique permissions. This page, for example, is named "Secret headquarters" and should only be visible to the members of the group "Secret service". All other users shouldn't even see the link to that page in the navigation, so basically nobody else but the members of the group should know there is such a page.

So, how do we hide a link to a page with custom permissions? And how exactly can we find out in which groups the user is in, and if the user is a member of the group "Secret service"?
Let me explain that to you.

Preparing a page for unique permissions

First of all, you need to create a group that will hold all the users that will have access to the "secret" page. I named my group "Secret service" and added some users. The group has read and edit permissions.
Then, you will need to create the page (if not already) that will be made hidden to all users except those who are a member of the group "Secret service". When you made the page, do the following:
  1. In your subsite, click on the "Settings" button on the top right corner
  2. Click on "Site content"
  3. Click on the name of the "Pages" library (or the "Subsites" library, depending on where you store your pages)
  4. Find the page you want to make secret, and click on the "..." on the right side of its name
  5. In the small modal dialog, click on "..." again and select "Shared with", then click on "Advanced"
  6. In the ribbon, top left icon, click on "Remove Unique Permissions", click "OK"
  7. Select the remaining groups and then click on "Remove User Permissions", click "OK"
  8. Click on "Grant Permissions", type in the name of the group that will have access to the page (in my case, that will be "Secret service")
  9. Click on "Show options" at the bottom of the dialog and untick "Send an email invitation"
  10. Select "Edit" permissions, press "OK"
  11. repeat steps 8 and 9, now select "Read" permissions, press "OK"
At this point, users who are not a member of the group "Secret service" will still see a link to the page in the navigation, but when they click on it, they will get a "Access denied" message.

Testing the permissions of the page

This will be quick and easy to test if you have a dummy account. If not, then I hope you have a colleague willing to spend 10 minutes of his/her time testing your environment. But let's just continue with the idea of having a dummy account.

First, let's add the dummy to the group and see if the dummy can access the page:
  1. With your administrator account, add the dummy account to the group "Secret service"
  2. Log in with the dummy account, navigate to the page "Secret headquarters"
    • If you can see the page with the dummy, then you did well!
    • If you can't see the page with the dummy, you probably didn't add the dummy user to the group "Secret service".
  3. Still on the dummy account, check if the dummy can see other pages in the same subsite
    • If you can still see all other pages with the dummy, then you did well!
    • If you can't see other pages with the dummy, then you probably set the unique permissions for the whole subsite instead of just the one page

Now we just need to check if the dummy will get an "Access denied" when the dummy tries to access the page without being a member of the group:
  1. With your administrator account, remove the dummy account from the group "Secret service"
  2. Log in with the dummy account, navigate to the page "Secret headquarters"
    • If you can't see the page with the dummy, you did well!
    • If you can see the page with the dummy, then you probably didn't remove the dummy from the group "Secret service".
If you passed these small tests, then we are ready to go to the next step!

Writing the code to hide the page from the navigation

Let's first write down what we want to achieve:
  1. Loop through all links in the navigation on the left side of the subsite
  2. When we encounter a list item in which the href attribute ends with "Secret-headquarters.aspx", we want to check the permissions of that page
  3. If we encounter such an element, we will run a function that will fetch all the groups in which the current user is in
    • If the current user is a member of the group "Secret service", we will take no action and leave the navigation as is.
    • If the current user is not a member of the group "Secret service", then we will select that list item holding the link to "Secret-headquarters.aspx" and set it hidden.
I included some comments, be sure to read those too!
// The following three lines are required, don't forget to find a copy 
//of "jquery.SPServices-2013.01.min.js" and add a reference to it here.
SP.SOD.executeFunc("sp.runtime.js");
SP.SOD.executeFunc("SP.js", "SP.ClientContext");
SP.SOD.executeOrDelayUntilScriptLoaded("SP.UserProfiles.js", 
 "~sitecollection/Style Library/Scripts/jquery.SPServices-2013.01.min.js");

var siteUrl = "";
var element = "";

$(document).ready(function() {
 // We only want to loop through the navigation on the left side of the
 // subsite;
 if($("#NavRootAspMenu") != null) {
  // If present, remove the last list item. This sometimes appears and 
  // causes problems since it doesn't have a href attribute.
  $("ul[id*='RootAspMenu'] li.ms-navedit-editArea:last-child").remove();
 }
});

runMe(); 

function runMe() {
 var $this = $("#NavRootAspMenu");
 if($this != null) {   
  $this.find("li").each(function(i){
   // For each list item that has a "a" element, fetch the "href" 
   // attribute and write it to siteUrl.
   siteUrl = $this.find("a.static")[i].href;
   // When the siteUrl ends with "Secret-headquarters.aspx", save the 
   // current element to "element" and run a function.
   if (siteUrl.indexOf("Secret-headquarters.aspx") > -1) {
    element = $this.find("a.static")[i];
    sharePointReady(siteUrl, element);
   }
  });
 }
}          
      
function sharePointReady(siteUrl, element) {
 // Create an array that will hold a list of all the groups where the 
 // current user is a member of.
 var userGroupArray = new Array();
 var group;
 
 // The line below is handy in case you have multiple pages you want to
 // hide, but need to be accessed by different groups. 
 if(siteUrl.indexOf("Secret-headquarters.aspx") >- 1) { 
  group = "Secret service";
 } 
 
 // Get all groups where the current user is a member of.
 var userGroup = $().SPServices({ 
  operation: "GetGroupCollectionFromUser", 
  userLoginName: $().SPServices.SPGetCurrentUser(), 
  async: false, 
  completefunc: function(xData, Status) {
   $(xData.responseXML).find("Group").each(function() {
    // Push the name of the group to the array.
    userGroupArray.push($(this).attr("Name"));
   });
  }
 });
 
 // This useful little function is to check if an element is contained in
 // your array. 
 function include(arr, obj) {
  for (var i = 0; i < arr.length; i++) {
   if (arr[i] == obj) return true;
  }
 }

 // If the array contains the group "Secret service", then do nothing. 
 if(include(userGroupArray,group)) {
  //console.log("You can edit this!");
 }
 // If the array does not contain the group "Secret service", then hide
 // the element from the current user so that he/she cannot navigate to
 // the page. 
 else {
  //console.log("You can't edit this!");
  element.style.display="none";
 }
}

That's it! We're ready with the script. Now it's time to test it out and see if it works.

Adding a reference to the master page

If we want to apply this code on multiple subsites, then it is best that we add a reference to our script in the master page. I just added the code to an existing script that was already loaded on the master page (I use a HTML master page), but if you want to add it as a separate script, this is how it might look like:
<!--SPM:<SharePoint:ScriptLink language="javascript" ID="scriptLink1" 
runat="server" name="~sitecollection/Style Library/Scripts/scripts.js" 
OnDemand="false" Localizable="false"/>-->

Do note that the ID might be different. You must make sure that you do not already have a scriptlink with the same ID, so change the number of the ID and make it unique.
Check in your master page and your script, and go take a look at the page.
You can re-do the steps mentioned in "Testing the permissions of the page", and this time you will immediately see if the list item for the page "Secret headquarters" is present in the list or not.
It should now be hidden from users who are not a member of the group "Secret service", and it will remain visible to those who are a member of that group.

Enjoy!

If you have any questions, please do not hesitate to ask!
Special thanks go to Ali Sharepoint from Stack Exchange, who helped me with the code.
The code for "JavaScript Array Contains" was found on www.css-tricks.com.

Friday, October 25, 2013

How to make an accordion menu for a subsite in SharePoint 2013

If you use term driven navigation to manage all the pages on your subsites, and you have a lot of pages for a certain subsite, then your navigation might turn out to be quite long. In situations like this, it might as well come in handy to have an accordion menu that just collapses or expands its contents (terms) upon click. I'm going to use jQuery and JavaScript for this.

Of course, it would also be important that terms having underlaying terms can't act as a link (the link behind them, if any, shouldn't activate and open a new page). Terms that have underlaying terms should expand and show their underlaying terms.

Here's a screenshot of a term driven navigation with all the terms and underlaying terms visible, no accordion used yet:

What we want is a navigation that looks like this:
 =>
 =>

So basically you have all the categories (the top terms) collapsed. Upon clicking on a term that has underlaying terms, it should expand and show the underlaying terms of that term you just clicked on. And so on.
In the example above, when you open the second category, the underlaying terms expand. In here, there is another term that has underlaying terms, which I named the subcategory. You can once again click on this one and it will expand, showing its respective underlaying terms. If a term no longer has underlaying terms, it cannot expand and it just opens the page.

And now the real work.

You will need to create a JavaScript file (or just add the code in an existing script file if you already use scripts on your site) and make sure to add it to your master page. Mine is named "script.js" and its path is "~sitecollection/Style Library/Scripts/script.js". You will also need jQuery, so make sure you have that as well. My jQuery file its path is "~sitecollection/Style Library/Scripts/jquery-1.10.2.min.js".

To correctly make a reference to your scripts, you must add them to your master page. I'm using a HTML master page. Edit your master page in advanced edit mode and add the reference code after the "ScriptLink" lines. The code below has five ScriptLink references (references to default SharePoint scripts), the code you must add has to be after those scripts.
// The following five lines are already in your master page
<!--SPM:<SharePoint:ScriptLink language="javascript" name="core.js" 
OnDemand="true" runat="server" Localizable="false"/>-->
<!--SPM:<SharePoint:ScriptLink language="javascript" name="menu.js" 
OnDemand="true" runat="server" Localizable="false"/>-->
<!--SPM:<SharePoint:ScriptLink language="javascript" name="callout.js" 
OnDemand="true" runat="server" Localizable="false"/>-->
<!--SPM:<SharePoint:ScriptLink language="javascript" name="sharing.js" 
OnDemand="true" runat="server" Localizable="false"/>-->
<!--SPM:<SharePoint:ScriptLink language="javascript" name="suitelinks.js"
OnDemand="true" runat="server" Localizable="false"/>--> 
     
// Now use these following two lines to reference to your JavaScript
// files, with first referencing to the jQuery script and then your 
// own script.
<!--SPM:<SharePoint:ScriptLink language="javascript" ID="scriptLink1" 
runat="server" OnDemand="false" Localizable="false" 
name="~sitecollection/Style Library/Scripts/jquery-1.10.2.min.js"/>-->
<!--SPM:<SharePoint:ScriptLink language="javascript" ID="scriptLink2" 
runat="server" OnDemand="false" Localizable="false" 
name="~sitecollection/Style Library/Scripts/scripts.js"/>-->

Now that you have correctly made a reference to the jQuery script and your own script, you can save the master page (for now, since we'll add some more later).

Let's start with the script.

This is what the code in my script.js file looks like. I will try to add comments in the code.
function accordionMe(selector, initalOpeningClass) {
   var speedo = 300;
   var $this = selector;
   var accordionStyle = true;

   // First of all, hide all ul's:
   $this.find("li>ul").hide(); 

   // Then for each li you find in that ul,
   $this.find("li").each(function(){ 
      // that isn't empty,
      if ($(this).find("ul").size() != 0) { 
         // find all the ones at the top,
         if ($(this).find("a:first")) { 
            // and make sure it won't do anything on click.
            $(this).find("a:first").click(function(){ return false; });
            // Optional: if you want to style the non-clickable links, 
            // then uncomment the code below. 
            //$(this).find("a:first").addClass("no-click");
         }
      }
   });

   // Open all items.
   $this.find("li."+initalOpeningClass).each(function(){ 
      $(this).parents("ul").slideDown(speedo); 
   });

   // Execute this function on click of li with an a tag.
   $this.find("li a").click(function(){ 
      if ($(this).parent().find("ul").size() != 0) {
         if (accordionStyle) { 
            if(!$(this).parent().find("ul").is(':visible')){
               // Fetch all parents.
               parents = $(this).parent().parents("ul"); 
               // Fetch all visible ul's.
               visible = $this.find("ul:visible"); 
               // Loop through.
               visible.each(function(visibleIndex){ 
                  var close = true;
                  // Check if the parent is closed.
                  parents.each(function(parentIndex){ 
                     if(parents[parentIndex] == visible[visibleIndex]){
                        close = false;
                        return false;
                     }
                  });
                  // If closed, slide the content of the ul up 
                  // (so collapse).
                  if(close){ 
                     if($(this).parent().find("ul") != 
                       visible[visibleIndex]){
                        $(visible[visibleIndex]).slideUp(speedo);
                     }
                  }
               });
            }
         }
         if($(this).parent().find("ul:first").is(":visible")) {
            $(this).parent().find("ul:first").slideUp(speedo);
         }
         else {
            $(this).parent().find("ul:first").slideDown(speedo);
         }
      }
   });
}

There you have it, your code is done! Now all we need to do is make sure it will execute the function as soon as a page is loaded. We need to get back to our master page for this. So open your master page again (in advanced edit mode) and find the following piece of code:
<script type="text/javascript">
//<![CDATA[
 var g_pageLoadAnimationParams = { elementSlideIn : "sideNavBox", 
 elementSlideInPhase2 : "contentBox" };
//]]>
</script>

We will not change that part, but we will have to paste some code underneath it. Here's the code:
<script type="text/javascript">
//<![CDATA[
 var g_pageLoadAnimationParams = { elementSlideIn : "sideNavBox", 
 elementSlideInPhase2 : "contentBox" };

 $(function runOnInitLoad() {
  accordionMe(jQuery("#zz9_RootAspMenu"), "selected");  
  accordionMe(jQuery("#zz10_RootAspMenu"), "selected");  
  accordionMe(jQuery("#zz11_RootAspMenu"), "selected");  
  accordionMe(jQuery("#zz12_RootAspMenu"), "selected");  
  accordionMe(jQuery("#zz13_RootAspMenu"), "selected");  
  accordionMe(jQuery("#zz14_RootAspMenu"), "selected");  
  accordionMe(jQuery("#zz15_RootAspMenu"), "selected");  
  accordionMe(jQuery("#zz16_RootAspMenu"), "selected");  
  runThisCode(); 
  moveScroller();
  setCustomFontName('#fseaFont-1-1-Menu');
 });

 ExecuteOrDelayUntilScriptLoaded(function() { runOnInitLoad(); }, 
 "init.js");
//]]>
</script>

The reason that I use the function on so many different ID's is because these menu ID's get used often, spread across the site. These are just all the ones I needed, so I added them all. Feel free to add/remove some.

After you have saved your master page, checked it in and published it as a major version (and don't forget to check in and publish your scripts as well), we're all done! You now should have a nice accordion menu, sliding up and down as you click on it. :) Enjoy!


PS.: I would like to express my thanks to Mathias Bosman, who seriously helped me with this (basically, he made the whole script work). Thanks Mathias!

How to show more than three levels of sub-menu items in a subsite navigation in SharePoint 2013

In the beginning when I was still learning SharePoint, I had made my first quick launch navigation. The first thing I noticed whas the inability to have more than two or three levels of submenu-items. This was really bothering me since I had to make quite some categories (as I like to call them).
So then I found out I should use a term set navigation. Upon creating a nice navigation with many terms that had underlying terms and so on, I was quite disappointed when I found out it was showing only the first two or three levels. So I started to dig around in the master page, and found out how to fix this.

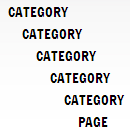
In the screenshot on the top right of the post, you can see up to six levels can be shown. Each level can be a category to define what kind of pages can be found underneath that category (like terms with underlaying terms, but I just like to refer to them as categories).

To activate this for your SharePoint site, you have to use term driven navigation and edit your master page. I have a HTML based master page, which means that if I make my changes in a HTML master page named "custom.html", it will then automatically convert it to a SharePoint fit master page named "custom.master". You will always need to make your changes in the HTML master page.
Anyway, I'll demonstrate what you need to do. I will use the code of the oslo.html master page.

In SharePoint Designer 2013, open your HTML-based master page in Advanced Editor mode. Search for "V4QuickLaunchMenu". You should find a long piece of code that looks like this:
<!--SPM:<SharePoint:AspMenu 
 id="V4QuickLaunchMenu" 
 runat="server" 
 EnableViewState="false" 
 DataSourceId="QuickLaunchSiteMap" 
 UseSimpleRendering="true" 
 Orientation="Horizontal" 
 StaticDisplayLevels="1" 
 DynamicHorizontalOffset="0" 
 AdjustForShowStartingNode="true" 
 MaximumDynamicDisplayLevels="2" 
 StaticPopoutImageUrl="/_layouts/15/images/menudark.gif?rev=23" 
 StaticPopoutImageTextFormatString="" 
 SkipLinkText="" 
 StaticSubMenuIndent="0"/>-->

Reformat it so that it looks like this:
<!--SPM:<SharePoint:AspMenu 
  id="V4QuickLaunchMenu" 
  runat="server" 
  EnableViewState="false" 
  DataSourceId="QuickLaunchSiteMap" 
  UseSimpleRendering="true"
  Orientation="Horizontal" 
  StaticDisplayLevels="1" 
  DynamicHorizontalOffset="0" 
  AdjustForShowStartingNode="true" 
  MaximumDynamicDisplayLevels="2" 
  StaticPopoutImageUrl="/_layouts/15/images/menudark.gif?rev=23" 
  StaticPopoutImageTextFormatString="" 
  SkipLinkText="" 
  StaticSubMenuIndent="0"/>-->

Now in order to get them to display from top to bottom, you have to change the value of Orientation from Orientation:"Horizontal" to Orientation:"Vertical".
To increase the amount of levels to display, change the value of StaticDisplayLevels from StaticDisplayLevels="1" to StaticDisplayLevels="6" and change the value of MaximumDisplayLevels from MaximumDynamicDisplayLevels="2" to MaximumDisplayLevels="6".
Your code should now look like this:
<!--SPM:<SharePoint:AspMenu 
  id="V4QuickLaunchMenu" 
  runat="server" 
  EnableViewState="false" 
  DataSourceId="QuickLaunchSiteMap" 
  UseSimpleRendering="true"
  Orientation="Vertical" 
  StaticDisplayLevels="6" 
  DynamicHorizontalOffset="0" 
  AdjustForShowStartingNode="true" 
  MaximumDynamicDisplayLevels="6" 
  StaticPopoutImageUrl="/_layouts/15/images/menudark.gif?rev=23" 
  StaticPopoutImageTextFormatString="" 
  SkipLinkText="" 
  StaticSubMenuIndent="0"/>-->

Save the master page. Make sure it is checked in and published as a major version (also, it has to be your defailt master page). Now go check if your term driven navigation is displayed correctly. If it does: hurray! You did it right! If it doesn't, then you might have missed a spot somewhere. ;)

Any questions, let me know.